Shopify Local Development & Theme Dev Store Setup: Complete Guide 2026
Complete guide to Shopify local development: setup dev store, Shopify CLI, theme development, local testing, hot reload, and best practices for building Shopify themes locally.
What is Shopify Local Development? (Quick Answer)
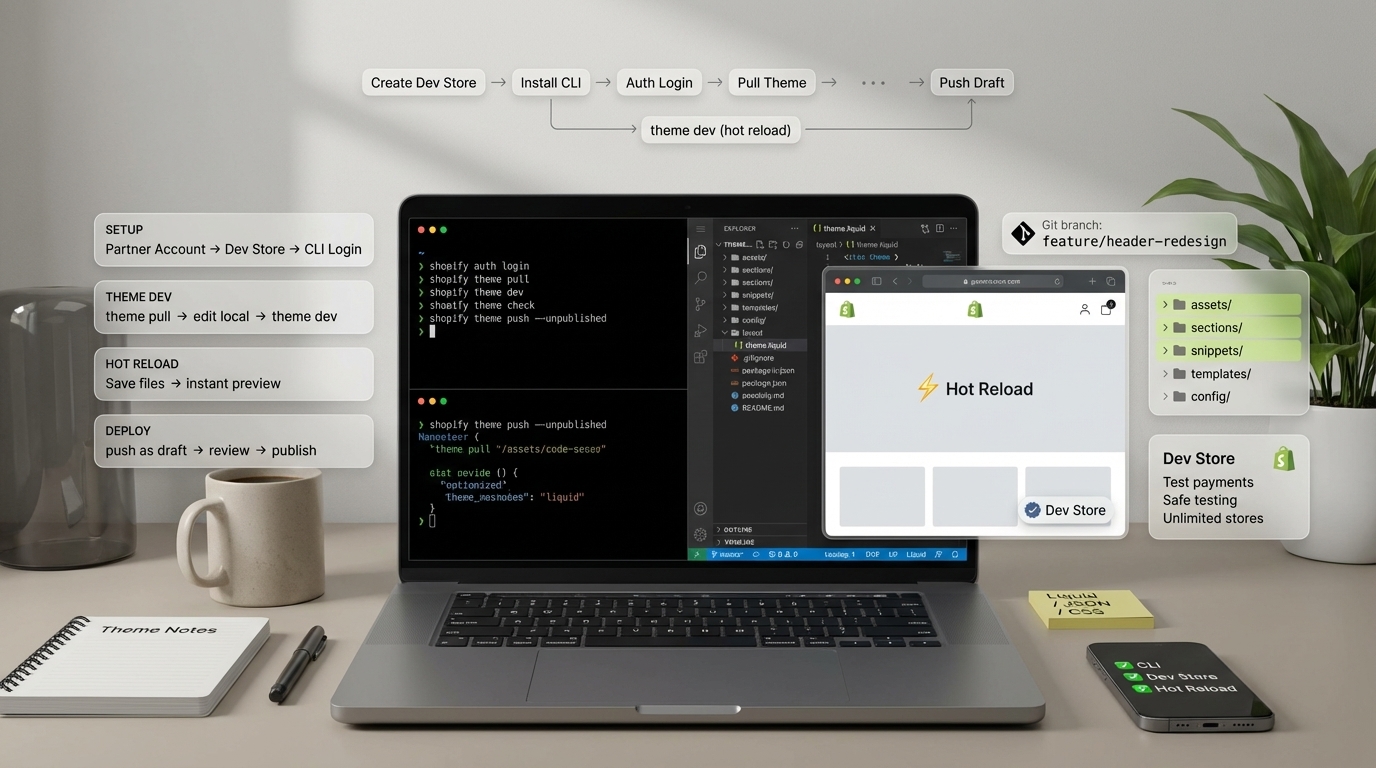
Shopify local development allows you to build and test Shopify themes, apps, and functionality on your local machine before deploying to a live store. Using Shopify CLI, you can run a development server locally, edit theme files, and see changes instantly with hot reload.
This workflow significantly speeds up development and allows testing without affecting live stores. Local development requires a Shopify theme dev store (free with Partner account), Shopify CLI, and Node.js.
Looking for professional Shopify development services? We’re Shopify development experts. Check out our Shopify development services for custom theme development.
Fuentes y Recursos Externos
- Shopify Developer Documentation - Documentación oficial de Shopify para desarrolladores
- Shopify Partners - Programa oficial de partners de Shopify
Why Use Local Development?
Benefits of Local Shopify Development
Key Advantages
- Faster development with instant hot reload (see changes immediately)
- No risk to live stores - test safely in dev store
- Free unlimited development stores with Partner account
- Better version control using Git
- Access to local debugging tools and IDEs
- Ability to work offline (syncs when online)
- Easier collaboration using Git workflows
- Professional development workflow
- Faster iteration - no upload delays
- Standard practice recommended by Shopify
Traditional vs Local Development
| Aspect | Traditional (Theme Editor) | Local Development |
|---|---|---|
| Development Speed | Slow - upload each change | Fast - instant hot reload |
| Version Control | Manual, difficult | Git integration |
| Testing | Live store or draft | Dev store (safe) |
| Debugging | Limited browser tools | Full IDE debugging |
| Collaboration | Manual file sharing | Git workflows |
| Offline Work | Not possible | Possible (with sync) |
| Best For | Quick edits | Professional development |
Setting Up Shopify Local Development
Prerequisites
What You Need
- [Shopify Partner account](https://partners.shopify.com) - Free to create
- [Shopify CLI](https://shopify.dev/docs/apps/tools/cli) - Official command-line tool
- Node.js v18 or higher - JavaScript runtime
- Git (optional but recommended) - Version control
- Code editor (VS Code, etc.) - For editing files
- Development store - Free with Partner account
Step-by-Step Setup
-
Create Shopify Partner Account
Sign up for a free [Shopify Partner account](https://partners.shopify.com). Partners get unlimited free development stores. This account is required for local development and accessing Shopify's development tools.
-
Create a Development Store
From your Partner Dashboard, create a new development store. Choose 'Development store' type. You can create unlimited dev stores for different projects. Dev stores have all Shopify features except live payment processing.
-
Install Node.js
Install [Node.js v18 or higher](https://nodejs.org/) on your machine. Shopify CLI requires Node.js to run. Verify installation with `node --version` in terminal.
-
Install Shopify CLI
Install [Shopify CLI](https://shopify.dev/docs/apps/tools/cli) globally: `npm install -g @shopify/cli @shopify/theme`. Or use npx: `npx @shopify/cli@latest`. Verify with `shopify version`.
-
Authenticate with Partner Account
Run `shopify auth login` in terminal. This opens your browser to authenticate with your Partner account. The CLI stores your credentials securely for future use.
-
Create or Pull a Theme
Create new theme: `shopify theme init`. Or pull existing theme: `shopify theme pull`. This downloads theme files to your local machine.
-
Start Local Development Server
Run `shopify theme dev` in your theme directory. This starts the local dev server, connects to your dev store, and enables hot reload. Your dev store URL opens automatically in browser.
Shopify CLI Commands
Essential Commands
| Command | Description | Use Case |
|---|---|---|
| `shopify theme dev` | Start local dev server with hot reload | Daily development work |
| `shopify theme pull` | Download theme from store to local | Get existing theme |
| `shopify theme push` | Upload local theme to store | Deploy changes |
| `shopify theme init` | Create new theme locally | Start new project |
| `shopify theme check` | Validate theme code (Liquid, JSON) | Before deployment |
| `shopify auth login` | Authenticate with Partner account | First-time setup |
| `shopify theme list` | List all themes in store | View available themes |
| `shopify theme publish` | Publish a theme to live | Go live with theme |
Command Examples
Start development:
shopify theme dev
# Starts local server, opens browser, enables hot reload
Pull existing theme:
shopify theme pull --store=your-dev-store.myshopify.com
# Downloads all theme files to local
Push to store:
shopify theme push --unpublished
# Creates draft theme in store (safe for production)
Check for errors:
shopify theme check
# Validates Liquid syntax, JSON, and best practices
Development Store Setup
Creating a Shopify Theme Dev Store
A development store (dev store) is a free Shopify store used for testing and development. It’s different from a regular store:
| Feature | Development Store | Regular Store |
|---|---|---|
| Cost | Free (unlimited) | $29-$299+/month |
| Payments | Test mode only | Live payments |
| Duration | 90 days (extendable) | Permanent |
| Purpose | Development & testing | Live business |
| Themes | All features | All features |
| APIs | Full access | Full access |
| Best For | Development, learning | Running business |
Setting Up Your Dev Store
-
Create Dev Store from Partner Dashboard
Go to [Partners Dashboard](https://partners.shopify.com), click 'Stores' → 'Add store' → 'Development store'. Choose store name and purpose. Dev stores are free and unlimited.
-
Configure Store Settings
Set up basic settings: store name, timezone, currency. Add test products if needed. Configure payment methods (test mode) and shipping. These settings help test your theme properly.
-
Install Starter Theme (Optional)
Install Dawn, Debut, or any starter theme to begin with. Or start with a blank theme. You can always pull themes from other stores or create from scratch.
-
Connect CLI to Dev Store
When running `shopify theme dev`, CLI will ask which store to use. Select your dev store. The CLI remembers your choice for future sessions.
Local Development Workflow
Typical Development Process
Development Workflow
- Start local dev server: `shopify theme dev`
- Edit theme files in your code editor
- Changes sync automatically (hot reload)
- Preview changes in browser (dev store URL)
- Test functionality and responsive design
- Commit changes to Git (version control)
- Run theme check: `shopify theme check`
- Push to dev store when ready: `shopify theme push`
- Test in dev store thoroughly
- Deploy to production when approved
Hot Reload Feature
Hot reload automatically refreshes your browser when you save changes to theme files. This feature:
- Updates instantly without manual refresh
- Preserves scroll position and state
- Works with Liquid templates, CSS, and JavaScript
- Significantly speeds up development
- Is enabled automatically with
shopify theme dev
File Structure & Organization
Theme File Structure
Local theme files follow Shopify’s standard structure:
theme-name/
├── assets/          # CSS, JavaScript, images
├── config/          # Theme settings (settings_schema.json)
├── layout/          # Layout templates (theme.liquid)
├── locales/         # Translation files
├── sections/        # Section files
├── snippets/        # Reusable code snippets
├── templates/       # Page templates
└── theme.liquid     # Main layout file
Version Control Best Practices
Git Best Practices
- Initialize Git repository in theme folder
- Create `.gitignore` for node_modules, .shopify, etc.
- Commit frequently with descriptive messages
- Use branches for features (feature/new-section)
- Never commit sensitive data (API keys, passwords)
- Keep commit history clean and organized
Common Development Tasks
Editing Liquid Templates
Liquid is Shopify’s templating language. Local development allows you to:
- Edit
.liquidfiles in your IDE - See changes instantly with hot reload
- Use proper syntax highlighting
- Debug with breakpoints
- Test template logic locally
Styling with CSS
CSS development:
- Edit CSS files in
assets/folder - Use modern CSS features
- Organize with partials
- See changes instantly
- Test responsive design
JavaScript Development
JavaScript features:
- Modern ES6+ syntax
- Module system support
- Local debugging
- Hot reload for JS files
- Integration with Shopify APIs
Debugging & Troubleshooting
Common Issues
| Issue | Solution | Prevention |
|---|---|---|
| CLI authentication fails | Run `shopify auth logout` then `shopify auth login` | Keep credentials updated |
| Changes not syncing | Restart dev server: Ctrl+C, then `shopify theme dev` | Check internet connection |
| Theme check errors | Fix Liquid/JSON syntax errors shown | Run `shopify theme check` frequently |
| Store not found | Verify store URL in CLI prompt | Use correct dev store |
| Node.js version error | Update to Node.js v18+ | Check version: `node --version` |
Debugging Tools
Debugging Resources
- Browser DevTools - Inspect elements, console, network
- Shopify Theme Inspector - [Official tool](https://shopify.dev/docs/themes/tools/theme-inspector)
- Liquid documentation - [Shopify.dev Liquid reference](https://shopify.dev/docs/api/liquid)
- Theme check - Validates code automatically
- Console logs - Debug JavaScript in browser
Deployment Workflow
From Local to Production
-
Test Thoroughly in Dev Store
Ensure all features work correctly. Test responsive design, checkout flow, and all functionality. Fix any issues before deploying.
-
Run Theme Check
Run `shopify theme check` to validate code. Fix any errors or warnings. This ensures code quality and compatibility.
-
Push as Draft Theme
Use `shopify theme push --unpublished` to create a draft theme in production store. This lets you review before going live.
-
Review in Production Store
Preview the draft theme in your production store. Test all functionality again in the production environment.
-
Publish When Ready
Once approved, publish the theme from Shopify admin or use `shopify theme publish`. Monitor for any issues after going live.
Best Practices
Local Development Best Practices
Development Best Practices
- Always use local development for theme work (never edit in Theme Editor)
- Use Git for version control (commit frequently)
- Test in dev store before pushing to production
- Run `shopify theme check` before deploying
- Keep Shopify CLI updated (`npm update -g @shopify/cli`)
- Use meaningful commit messages
- Document complex Liquid logic
- Follow [Shopify theme development guidelines](https://shopify.dev/docs/themes)
- Test on multiple devices and browsers
- Keep local files organized and clean
Resources & Documentation
Official Shopify Resources
Key resources for local development:
- Shopify CLI Documentation - Complete CLI guide
- Shopify Partners - Partner program and dev stores
- Shopify.dev - Developer documentation hub
- Liquid Documentation - Theme templating language
- Theme Development Guides - Theme development best practices
- Shopify Community - Developer forums and support
Helpful Tools
Development Tools
- [Shopify Theme Inspector](https://shopify.dev/docs/themes/tools/theme-inspector) - Debug themes
- [Liquid Reference](https://shopify.dev/docs/api/liquid) - Liquid syntax reference
- [VS Code Shopify Extension](https://marketplace.visualstudio.com/items?itemName=Shopify.liquid) - IDE support
- Browser DevTools - Built-in debugging
- [Shopify CLI GitHub](https://github.com/Shopify/cli) - CLI source and issues
Summary: Shopify Local Development Setup
| Step | Tool/Resource | Command/Action |
|---|---|---|
| 1. Create Partner Account | [Shopify Partners](https://partners.shopify.com) | Sign up (free) |
| 2. Create Dev Store | Partner Dashboard | Add development store |
| 3. Install Node.js | [Node.js](https://nodejs.org/) | Download v18+ |
| 4. Install Shopify CLI | [Shopify CLI](https://shopify.dev/docs/apps/tools/cli) | `npm install -g @shopify/cli` |
| 5. Authenticate | Shopify CLI | `shopify auth login` |
| 6. Pull/Create Theme | Shopify CLI | `shopify theme pull` or `init` |
| 7. Start Development | Shopify CLI | `shopify theme dev` |
| 8. Deploy | Shopify CLI | `shopify theme push --unpublished` |
Pro tip: Always test in dev store first! Never push directly to production without testing. Use `shopify theme check` before deployment to catch errors early.
FAQ
Frequently asked questions
What is Shopify local development?
Shopify local development allows you to build and test Shopify themes, apps, and functionality on your local machine before deploying to a live store. Using [Shopify CLI](https://shopify.dev/docs/apps/tools/cli), you can run a development server locally, edit theme files, and see changes instantly with hot reload. Local development requires: A Shopify Partner account, A development store (dev store), Shopify CLI installed, and Node.js. This workflow significantly speeds up development and allows testing without affecting live stores.
How do I set up a Shopify theme dev store?
To set up a Shopify theme dev store: 1) Create a [Shopify Partner account](https://partners.shopify.com) (free), 2) Create a development store from your Partner Dashboard, 3) Install [Shopify CLI](https://shopify.dev/docs/apps/tools/cli) on your machine, 4) Authenticate CLI with your Partner account (`shopify auth login`), 5) Create or pull a theme (`shopify theme dev`), 6) Start local development server. Development stores are free, unlimited, and perfect for testing. They have all Shopify features except live payments.
What tools do I need for Shopify local development?
For Shopify local development you need: [Shopify CLI](https://shopify.dev/docs/apps/tools/cli) - Command-line tool for development, Node.js (v18+) - Required runtime, A Shopify Partner account - Free to create, A development store - Free unlimited dev stores, Git - Version control (recommended), A code editor (VS Code, etc.), and Local theme files. Shopify CLI handles authentication, file syncing, hot reload, and deployment. The CLI connects your local files to your dev store automatically.
How does Shopify CLI work for local development?
Shopify CLI connects your local development environment to your Shopify store. Commands: `shopify theme dev` - Starts local dev server with hot reload, `shopify theme pull` - Downloads theme from store, `shopify theme push` - Uploads theme to store, `shopify auth login` - Authenticates with Partner account, `shopify theme check` - Validates theme code. The CLI syncs changes between local files and the store, enables hot reload for instant preview, and handles authentication automatically. It's the official tool recommended by [Shopify](https://shopify.dev).
Can I develop Shopify themes locally without a store?
No, you need a Shopify store (development store) for local theme development. However, development stores are free and unlimited with a [Shopify Partner account](https://partners.shopify.com). You can create multiple dev stores for different projects. The local development server connects to your dev store via Shopify CLI. While you edit files locally, changes sync to the dev store and you preview them on the actual Shopify storefront. This ensures your theme works correctly with Shopify's Liquid engine and APIs.
What are the benefits of local Shopify development?
Benefits of local Shopify development: Faster development with instant hot reload, No risk to live stores while testing, Free unlimited development stores, Better version control (Git), Access to local debugging tools, Ability to work offline (with sync when online), Easier collaboration using Git, and Professional development workflow. Local development is the standard practice recommended by Shopify and used by all professional Shopify developers.
How do I deploy changes from local development to production?
To deploy from local development to production: 1) Test thoroughly in your dev store, 2) Use `shopify theme push --unpublished` to create a draft theme in production, 3) Review the draft theme in your production store, 4) Publish the theme when ready, or use `shopify theme push --live` to push directly (not recommended without testing). Always test in dev store first. Use version control (Git) to track changes. Consider staging environments for complex projects. The [Shopify CLI](https://shopify.dev/docs/apps/tools/cli) handles deployment seamlessly.
Conclusion
Shopify local development is the professional standard for building Shopify themes and apps. Using Shopify CLI and a development store, you can develop faster, test safely, and maintain better code quality with version control.
Key takeaways:
- Local development requires Shopify CLI, Node.js, and a dev store
- Development stores are free and unlimited with Partner account
- Hot reload makes development significantly faster
- Version control with Git is essential for professional workflows
- Always test in dev store before deploying to production
- Shopify CLI handles authentication, syncing, and deployment automatically
- Standard practice recommended by Shopify for all theme development
Our recommendation: Set up local development for all Shopify projects. The initial setup takes 10-15 minutes, but the productivity gains are enormous. Use Shopify CLI for the best experience, follow Shopify’s development guidelines, and always test thoroughly before deployment.
Ready to start local development? Follow the setup steps above and join thousands of developers using this professional workflow.